| Windows 7,中文名称视窗7,是由微软公司(Microsoft)开发的操作系统,内核版本号为Windows NT 6.1。Windows 7可供家庭及商业工作环境:笔记本电脑 、平板电脑 、多媒体中心等使用。Windows 7可供选择的版本有:入门版(Starter)、家庭普通版(Home Basic)、家庭高级版(Home Premium)、专业版(Professional)、企业版(Enterprise)(非零售)、旗舰版(Ultimate)。 对于用惯了XP操作系统的人来说,初次使用W7系统操作系统的人总是有一种不适应的感觉,那么W7系统操作系统如何设置DNS地址呢?下文ghost123小编就分享了W7系统操作系统设置DNS地址的方法,希望对大家有所帮助。
W7系统操作系统设置DNS地址方法
1.在“开始”中找到“运行”(或者直接【Win】+【R】),然后输入“cmd”进入管理员操作界面:


2、在管理员界面中输入命令:ipconfig/all然后按Enter键确认即可显示Windows IP配置,在这里我们可以查看我们的DNS服务器地址。


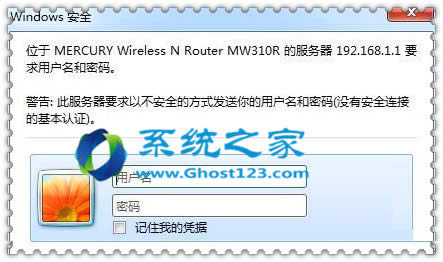
3、如果你连接了路由的话也可以通过路由来查看你的DNS服务器地址,在浏览器输入地址192.168.1.1弹出路由器登入对话框,通常路由器默认的账户密码均为:admin(登入后可修改)。登入路由之后我们就可以在首页查看到DNS服务器地址了。

4、知道了DNS地址我们就可以来修改了,点击电脑右下角的连接图标,选择“打开网络和共享中心”,当然也可以在控制面板中“网络和Internet”进入“打开网络和共享中心”:


5、进入“网络和共享中心”后,我们再点击“本地连接”进入“本地连接 状态”对话框:


6、在“本地连接 状态”对话框中点击“属性”选项,弹出本地连接属性对话框:

7、这里我们选中本地连接属性对话框中的“Internet 协议版本4 (ICP/iPv4)”,双击后者选择下方的属性,之后即可进入“Internet 协议版本4 (ICP/iPv4)属性对话框”,在这里边即可更改DNS设置。
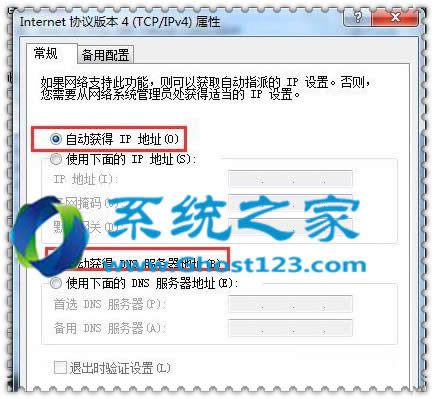
8、在“Internet 协议版本4属性”对话框中即可更改DNS地址了,选中“使用下面的DNS服务器地址”,然后DNS地址成为可编辑状态,再把我们查看到的DNS地址填写上再确认即可。
首选 DNS 服务器(P) 202.96.128.166
备用 DNS 服务器(A) 202.96.134.133

windows 7 的设计主要围绕五个重点——针对笔记本电脑的特有设计;基于应用服务的设计;用户的个性化;视听娱乐的优化;用户易用性的新引擎。 跳跃列表,系统故障快速修复等,这些新功能令Windows 7成为最易用的Windows。
| 